Short Put Butterfly

Risk: limited
Reward: limited
General Description
Entering a short put butterfly entails selling (1) lower strike put, buying (2) middle strike puts and selling (1) higher strike put (same expiration month, strikes are equal distance). It's essentially a combination of a lower strike bear put spread and a higher strike bull put spread, and it's similar to a short put condor except the long puts use the same strike.
(draw a short put buttefly risk diagram here)
The Thinking
You're not bullish or bearish, but you do think a big move is coming and along with it, an expansion in volatility. You employ a lower strike bear put spread, which achieves max profitability when the underlying drops (although profitability is capped) and a higher strike bull put spread, which achieves max profitability when the underlying rallies (although profitability is capped). If you are correct, if the stock moves big (preferably above the upper strike or below the lower strike) you'll profit.
Example
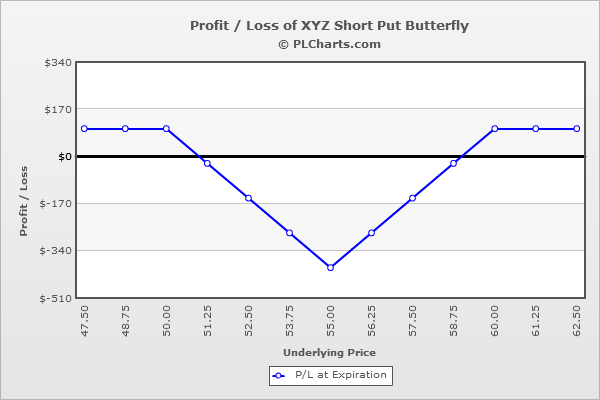
XYZ is at $55.00, and your analysis says a big move is coming (earnings or some other big announcement). You sell (1) 50 put for $1.00, buy (2) 55 puts for $3.00 and sell (1) 60 put for $6.00. The net credit is $1.00.
Above the highest strike, all puts expire worthless, and your profit is the net credit received when the trade was initiated.
Below the lowest strike, all puts are in-the-money and exactly cancel each other out. Your profit is the net credit received when the trade was initiated. For example, if the stock is at $45, the 50 put is worth $5.00 ($4.00 loss), the 55 puts are worth $10.00 ($7.00 profit each) and the $60 put is worth $15 ($9.00 loss). The net of this is a $1.00 profit.
At $55, your max loss occurs because the loss from the long puts at the middle strike will be greater than the gains from the short puts at the outer strikes. At $55, the 50 put is worthless ($1.00 profit), the 55 puts are worthless ($3.00 loss each) and the $60 put is worth $5 ($1.00 gain). The net of this is a $4.00 loss.
The PL chart below graphically shows where this trade will be profitable and at a loss.

|

